Developing a Mac OSX app: Dice
There are two things we like here at design-nation: dices, and Mac OSX applications. So, we have developed a little application ( you guessed it, a dice ) just to show how is the development process under Mac OSX. This tutorial will cover all the development process, using XCode 2.1 and writing Objective-C code.
As every possible tutorial about XCode in the world, this one is obscured by the tutorial that you can find at the Apple Developer Connection. Go read it!
But first, take a look at the final result:
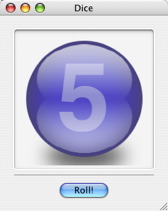
Before we start coding, let’s think about the way that we are going to implement the application. We’ll have to generate a random number between 1 and 6. Then, we’ll load a png containing the face of the dice that corresponds to that random number, and show it in the interface.
It will always be a good practice to implement any application following the MVC paradigm, but, we’ll see how XCode and the Interface Builder make that implementation extremely easy and intuitive.
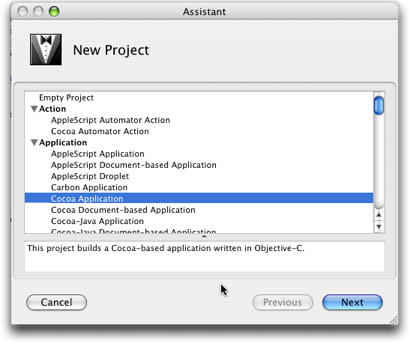
So, let’s start working. First of all, open XCode ( if you don’t find it, it’s hidden in the /Developer/Applications folder ). Then select File-> New Project, and when prompted, select "Cocoa Application". Then, select the name and location of your project files. After that, the "Project window" will be displayed
We won’t explain what are the files and folders that XCode has created. There are a lot of tutorials ( and even the XCode docs ) that explain it. So we will start working in our interface.
But, why will we start working on the interface?. Our application will be MVC- based. That means that the user interface ( the view ) will be completely independent of the core logic ( the model ). And XCode and the interface builder do an excellent job in building MVC based applications. A special MVC. Some people will say that it’s not really MVC, although it’s the implementation we most like.
So, double-click the MainMenu.nib file. That will launch the Interface Builder.
The Interface Builder is a visual tool that will help us build the interface of our app. And using the Interface Builder, we will assure ourselves than the user interface of our application will follow Apple’s User Interface Guidelines. Let’s see how.
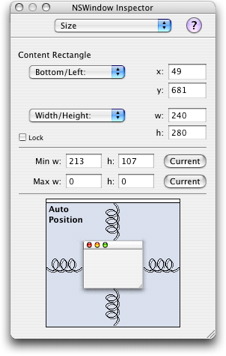
First of all, adapt the size of the program window to your needs. To do so, you can just drag the lower-right corner of the window, or open the Inspector, select Size, and enter the values. We entered 240 as width and 280 as height. In the attributes section, you can change the window’s name, background, and some other properties.
Now, it’s time to add the UI elements that we are going to need. We’ll add a NSImage View ( from the Cocoa-Containers tab ) and a Button ( from the Cocoa-controls tab ).
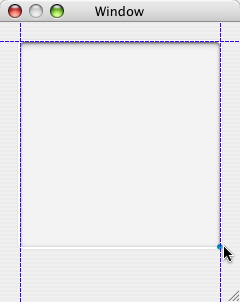
Drag the image view, and drop it over the window. As your drag it, you’ll see how the interface builder draws some lines to help you position the item. Following those guides will ensure you that you’re following Apple’s User Interface Guidelines.
Then add the button to the interface. Drag the button from the palette to your application’s interface ( remember, let the guides, you know, guide you ), and after dropping it, while it’s still selected, press Option, and move it using the cursor. You’ll see how the Interface Builder shows the distance from the button to the interface item under the cursor. So place the cursor over the ImageView, and center the button.
Now, set the button’s text ( double-click it ), and in the info panel, go to the attributes pane and select the keyboard shortcut for the button ( in this example, Enter ).
Now, it’s time to set the initialFirstResponser for your interface. So, you can be sure that your button will be focused when the application loads. To do so, Control+Drag a connection line from the window instance in the MainMenu.nib window to the button, then, in the info window select initialFirstResponder, and click "Connect".
So, the interface is almost finished. Don’t forget to save the nib file. Now it’s time to connect this interface with the application’s model. To do so, we’ll use the controller.
But before doing so, we’ll take a quick look at what outlets and actions are. Outlets are instance variables that point to another object. So, that’s it. An outlet is a reference that an object has to another object. An action is similar to a public method in the class. It is like a command encapsulated with its target.
Anyway, the Interface Builder simplifies the process of creating outlets and actions.
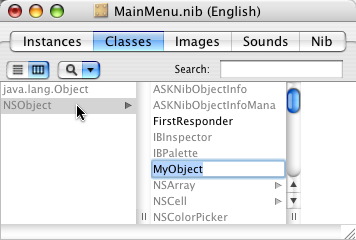
First of all, we’ll have to specify the controller class, then we’ll create an instance of that class, and after that we’ll connect that class to the interface. So, first, create the class. In the classes pane of the MainMenu.nib window, click NSObject in the leftmost column, and then press return. Then, name the new class "DiceController". That way, you will create a subclass of NSObject ( every class in objective-c extends NSObject ) .
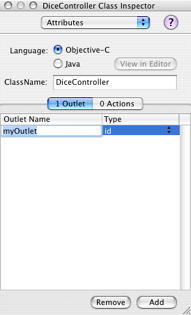
Now, we’ll define the outlets of that class. DiceController is, well, the controller, so it will have an outlet to the NSImageView in the user interface, and also to the model ( a class that we have not created yet ). So, select "DiceController", and in the info window, be sure to select the Attributes pane. Then, be sure that the Outlets pane is also selected, and then just click add. Name the outlet imageView and select its type to NSImageView ( a bit of strong typing will do no harm ).
Now, add another outlet. That second outlet will point to the model. Name it dice.
Now, let’s create the action that will be triggered when the button is clicked. Click the actions pane ( in the info window ), click the add button, and give the action the following name: roll ( the interface builder will add a colon ":" after the name ).
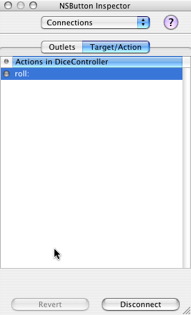
So, the controller has been described, including its outlets and actions. Now it’s time to connect this class to the interface. . To do so, first, we’ll have to create an instance of the DiceController class, selecting the class in the MainMenu.nib window, and then selecting Instantiate in the Classes menu. The new created instance will appear in the instances view. To connect it to the interface, Control-drag from the class instance to the NSImageView in the interface. When the mouse button is released, select the outlet that will be assigned to that connection ( in our example "imageView" ), and click connect. To connect the button in the view with the instance of DiceController, Control-Drag from the button in the interface to the instance of DiceController. When the mouse is released, select roll in the actions column, and click Connect
To create the model ( Dice ), just define a new subclass of NSObject and create an instance of the new class. Then, create an outlet connection between DiceController and Dice. So, everything is connected now!.
Once the interface is finished, and the classes are connected, we have to generate the source files that contain, you guessed it, the source code of the controller and the model. So, go to the classes panel of the MainMenu.nib window, select one of those classes ( DiceController, for instance ), and the select Create classes in the Classes menu. Do the same with DiceModel.
Browse the new created files. You’ll see that there is an empty method called roll in the DiceController.m file. Just implement it:
@implementation DiceController

- (IBAction)roll:(id)sender
{
[ imageView setImage: [ dice image ] ];
}

@end
The code is quite simple. We will just set the content of the NSImageView ( which is one of the outlets of the DiceController class ), setting its value with an image returned by the Model ( the other outlet )
Now, it’s time to implement the model. The model will have a method that will generate a random number ( between 1 and 6 ) and load a different png from disk depending of that value. Then it will and pass an NSImage instance to the controller.
So, the constructor of the model will be:
-( id ) init
{
self = [ super init ];
image = nil;
srand( time( NULL ) );
return self;
}
The NSImage will be released , to avoid memory leaks, when the model is deallocated:
- ( void ) dealloc
{
[ image release ];
[ super dealloc ];
}
The method that loads the png will get it from the application bundle. So, first, it will need to use the NSBundle class:
-( NSImage* ) image
{
NSBundle *bundle = [ NSBundle bundleForClass: [ self class ] ];

NSString *imgName = [ bundle pathForResource: [ self generateImageName ] ofType: @"png" ];

image = [ [ NSImage alloc ]
			initWithContentsOfFile: imgName ];

return image;
}
The complete code of the Dice.m file will be:
#import "Dice.h"

@implementation Dice

-( id ) init
{
self = [ super init ];
image = nil;
srand( time( NULL ) );
return self;
}

- ( void ) dealloc
{
[ image release ];
[ super dealloc ];
}

-( NSString* ) generateImageName
{
int random = ( rand( ) % 6+ 1 );

return [ NSString stringWithFormat: @"%i", random ];
}

-( NSImage* ) image
{
NSBundle *bundle = [ NSBundle bundleForClass: [ self class ] ];

NSString *imgName = [ bundle pathForResource: [ self generateImageName ] ofType: @"png" ];

image = [ [ NSImage alloc ]
		initWithContentsOfFile: imgName ];

return image;
}

@end
Now, build the application, and you are done!. Well, not really.. We’ll have to package our application properly. We’ll create a disk image containing the application bundle and a rtf file with the installation instructions ( something like "drag the app bundle to your Applications folder" ).
We’ll create the disk image using the Disk Utility, ( /Applications/Utilities/Disk Utility ). Open the Disk Utility, create a new Disk Image, assign its size, and it will be created and mounted. Drag your application bundle and all the other files you want to include into the new Disk Image, and you’re done.
And that's all!